SEO for Squarespace: Image Size Optimization
Among many SEO tools to improve your Squarespace website, image size optimization is absolutely the most important! I am a broken record about this topic and feel very passionate to share this information with fellow photographers. If you are a photographer like me, you simply cannot afford any potential client leaving your site because your website is taking forever to load. Today, I will show you how to optimize your Squarespace website like a PRO! I will specifically address the image size optimization and give you all the tools necessary to help get your photography web pages load fast and look amazing!
WHY IT’S IMPORTANT
Before we dive into the SEO checklist for image optimization, let’s understand why we need to do this. Optimizing your Squarespace photography website will help you:
Speed up all your web pages that have images
Improve client experience while viewing your portfolio
Create better engagement
Let search engines know you are optimized and therefore improve your chance of ranking higher when your potential client searches your keywords.
Prevent people from bouncing before your home page even loads
Help you stand out from your competitors with slow websites and blurry images
SPEED TEST
First things first, check the speed and usability of the site you already have! Most useful tool I found to do this is Google PageSpeed Insights
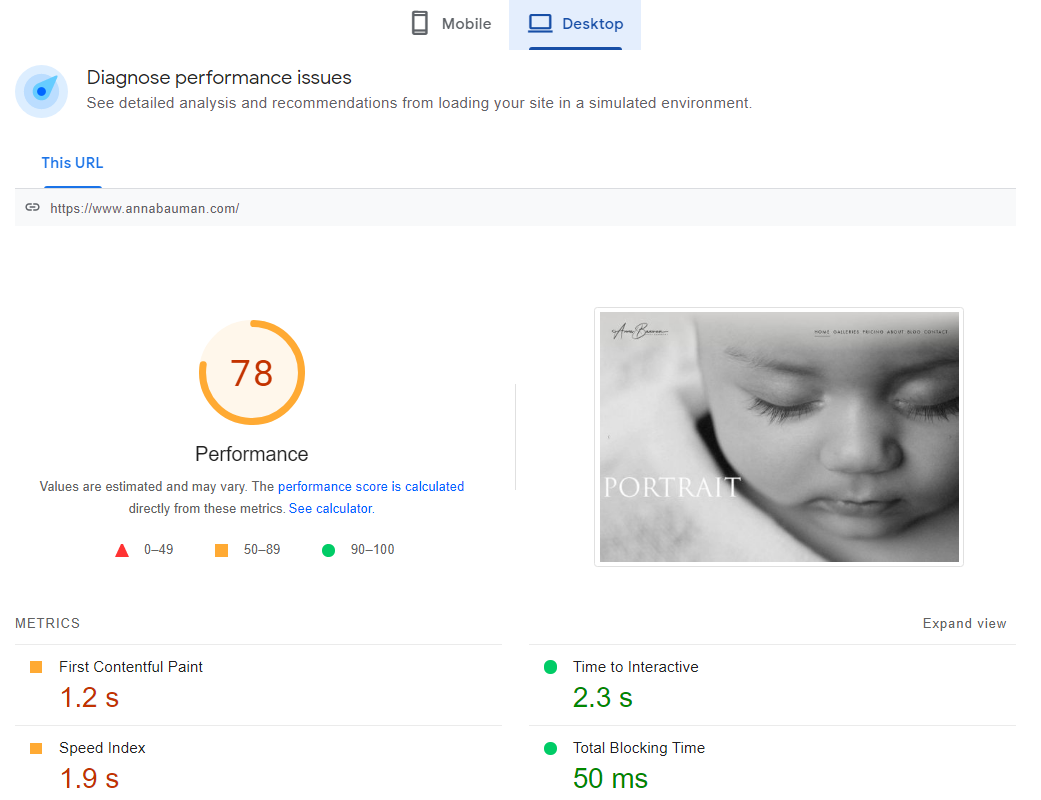
Enter your website’s URL including the “https://” portion. Once you run this tool, it will test loading time and performance on both mobile and desktop. It will tell you exactly where your site needs improvements and approximately how many seconds these improvements will help you save on your total loading time. I like this tool because it gives you a grade which lets you know immediately how close your site is to being in all green!
As you can see, I got a score of 78. Looking at the suggested improvements, I find that a few of my images can be compressed more – the links will take me to those exact images so I know which of the images need my attention.
This isn’t a necessary step because the results vary sometimes even when checking after a few minutes.
FILE FORMATS
Two things to remember here:
Use a large size .PNG file for your logo. That’s right this is the only file you should upload full resolution in my opinion. Smaller size .PNG in my experience makes the logo blurry on some mobile and desktop screens. If you are going to write a blog post with screenshots (and other graphics) the way I do in this post - make sure you are uploading .PNG files as well.
Use only .JPG for all photographs except if one of your photographs have a text on it (.PNG is a better option for this)
IMAGE SIZING
Banner images:
Usually this is on your homepage and more often a landscape orientation, in any case, the size for these should be between 2000px – 2500px in width. If you look at my homepage, I have a slideshow of images as my banner and each one of those are 2500px wide by 1406px tall.
All other images:
I would go with 1500px width for all your other images. Less is better so see how low you can go without affecting quality of your photo. I would try to stay under 1500px for both portrait and landscape.
IMAGE COMPRESSING
Squarespace recommends each image be less than 500 KB with a total page size of less than 5 MB. You really want to stick to this rule – I would even push this towards 250KB if possible without damaging the image quality. However, in my honest opinion, the main thing is to stay under 5MB page size.
The tools you will need for this job are:
https://sitechecker.pro/page-size/ - use this to check your page size in kilobytes. If your page exceeds 5MB, you have some compressing to do.
https://www.bulkresizephotos.com/ - compress your images using this tool first. I absolutely love it! After using way too many slow sites for compressing images I found this site is the fastest and easiest to use. Images compress beautifully keeping all the details and color exactly the same as the originals. One really awesome feature of this site is being able to bulk compress images using file size! You just set your limit (let’s say 500KB) and all your images will be compressed to be just under 500KB.
https://tinypng.com/ - is another great tool for outputting compressed images. It is a little slower but the quality is usually very good. I recommend this tool for Mac users especially. Use this tool to compress your images even further triple-checking the quality of each images before uploading to your website.
One more recent discovery is https://www.websiteplanet.com/webtools/imagecompressor/. This tool lets you select compression mode from Low, Medium, and High and shows you what the final size of the photo will be before it automatically downloads on your computer. Although the quality of the compression is not as good as the other two websites.
Feel free to ask questions about any of the topics covered in this blog post and remember to always optimize your images before adding them to your Squarespace website. I am pretty sure that all the tools listed above will work for your non-Squarespace website too. Good luck!


